The WordPress.com stats helper monkeys prepared a 2012 annual report for this blog.
Here’s an excerpt:
4,329 films were submitted to the 2012 Cannes Film Festival. This blog had 29,000 views in 2012. If each view were a film, this blog would power 7 Film Festivals
I have always wanted to make a 1000 PYRAMIDS QUILT and I have finally started one. While cutting my scraps for Easy Street, I thought to myself I should start cutting my pyramids. I hope to have one pyramid from every fat quarter I own. I will probably get two as I found it I could get two pyramids from a 9 inch by 18 inch cut of fat quarter fabric I have. I am going to float them on a white background. I have a whole bolt of WHITE KONA that I have wanted to use to make a modern quilt with. This will be my version of a MODERN QUILT.
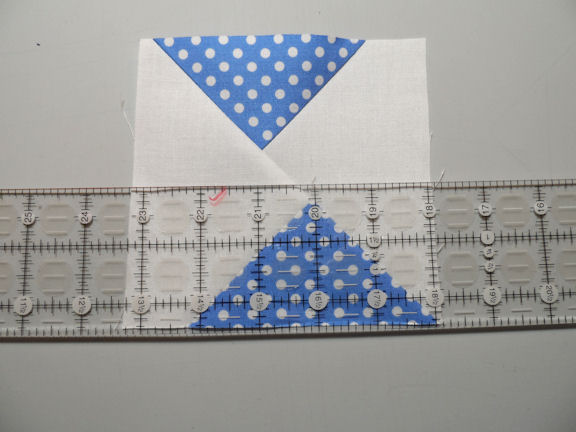
CUT FROM A 8.5 INCH X 10 INCH PATCH: added 2-1/2 inch strip
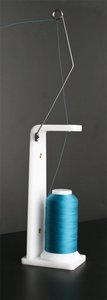
I am sewing a 2.5 strip of the white KONA to each triangle prior to cutting then I cut them out at the same time. This works good for single patches but worked best for a fat quarter section. ( See pictures.)
.
.
. I used my EQ7 to plot out my idea for the quilt. I want the triangles to float in a field of white. Well this is a start. I plan to start cutting during the BOXING DAY SEW IN…. ARE YOU JOINING US ON TWITTER?
ADDENDUM: 12-26-2012
I will also be doing PYRAMID within a PYRAMID blocks for my quilt. I figure I can use up a lot of scraps by making these blocks. I will be paper piecing them from a pattern I made in EQ7; I think that will make them accurate. I will be doing several trial triangle blocks till I get them CORRECT. The patches are made from 3×3 squares but I won’t know for sure till I do a mock up of the blocks… I hope to test the pattern out this weekend. Wish me luck.
Here are my flying geese. I am making a baby quilt with my blocks. The first time I calculated the number of geese I would need I underestimated by half. I had to make more geese. I have had a severe cold and been taking codeine cough syrup, so my math skills took a total decline. I also sewed several flying geese backwards, putting the background geese on the bottom instead of the top. I had to rip it, rip it, rip it. Because of the size of the scraps I am using I cut each patch individually. I used Bonnie’s method of cutting my patches using the angle rulers. This time it went easier since I have figured out how to piece the patches easier.
My recommendation do not sew on strong medication.
*
*
*
*
*
Over View of panel – FMQ
*
*
*
*
*
Over view of FMQ Panel… Now for the borders….
LEFT HALF
*
*
*
*
* Panel’s left in detail….
Right half of panel
RIGHT half of my panel, in detail. I am getting closer to the end. I hope to have it done by New Years when we go see the family.
Recommended by Patsy Thompson in her DVDs about FREE MOTION QUILTING, Machine applique ( Vines and Leaves 2) I have been playing with some machine applique and like the ability to mark the quilt and wash out the markings. This method is similar to marking your dress fabric with marking papers but the markings are temporary.
*
*
*
*
*
*
*
*
*
Ricky Stable Stuff and Wash away Applique (fusible) Freezer paper
RICKY TIMs STABLE STUFF …. used for paper piecing, bobbin work and marking a quilt.
I often use these items interchangeably. The Wash-Away is fusible but Ricky’s product is not it is also less expensive. I like using them in paper piecing projects along with the applique. I hate tearing paper out and this stuff can get left in the block/ quilt. When you wash your quilt it softens and disappears… leaving at most a fine pellon like fabric behind. I have also used these products in bobbin work. And when I made a christening quilt I used them with wash away thread to mark the quilt for free motion quilting. All of the lessons on how to do these techniques came from Ricky Tims’ Grand Finale DVD and THE QUILT SHOW. I have all of those DVDs. I like the show because I learn so much and love to play with the new and interesting techniques.
http://www.sue-nickels.com/store.php?cat=4
Both products have been shown to be very useful. The pencils are a silver but I think they come in other colors. They are
chalk base and allow you to mark quilts through stencils or free hand. Once again a wash away product. I find since I am doing more free motion quilting and small experimental projects I use these pencils more and more. The sharpener makes a nice point and works better then all the other sharpeners I have use. My biggest problems is to keep the sharpener to myself. The family tends to “borrow” them.
I also liked the Eazy Cut snippers I bought from Sue Nickles. I found them very handy when FMQ as we used the pull up the bobbin thread then stitch tiny and begin your motifs. I would then cut off the tails of the threads. The tips are curved so they are less likely to snip your fabric. They are easy to use.
LETS FACE IT … I am a sewing notion junky I buy them all and try them out. Good for you cause you can just take advantage of my experimentation and buy the things I recommend. I will also let you know what I actually hate and found the product did not live up to the hype. Maybe I can save your money for you.
Happy Quilting,
Nonnie
PS ONCE again I am fighting with the formatting for my blog. That is why you get the funky little ****** !
I record a podcast about quilting on an irregular basis I have about 40 episodes posted. In them I rave and rant about my finds relating to quilting. I discuss the latest speaker at my quilt guild, my latest reviews of quilting books and products. Rants and raves about my latest quilting product and since I work full time, live with my grandson and daughter I do not get to quilt as much as I would like.
YOU can find my podcast by googling NONNIE’S QUILTING DREAMS, podcast, blog, Links will pop up… and of course click on the link above AND below will take you there. I am also on iTUNES and Stitcher, so you can find me there. Leave a comment there if you have the time. ….
TO DOWN LOAD A PODCAST TO YOUR COMPUTER….. so you can listen in your MEDIA PLAYER
RIGHT CLICK on the MP3 icon or the download icon
A window pops up and you can select SAVE LINK AS ( FIRE FOX) …. the file will then load to whatever folder you want ( I put mine in MY MUSIC.)
IN Window Explores use SAVE TARGET AS then the file will be saved to your folder.
IN CHROME use the SAVE LINK AS and again the file will be saved in the folder…..
Easiest way is just to go to i TUNES and download NONNIE QUILTING DREAMS and all the other podcasters there…. have fun
I made several of my blocks using Bonnie Hunter’s directions from her blog. LINK to BONNIE’S EASY STREET MYSTERY QUILT My problem was the fabric I was using. I had many scraps/ patches that could be used; left overs from other projects. I had over 20 green half triangles that were 4-1/2 inches in size. I decided to use them in this project. Maybe foolish but I am the QUEEN of MAKING DO WITH WHAT YOU HAVE. I should mention that I do not square up my blocks till just before I use them. I think they stay nicer and fit better with less wear and tear on the edges of the blocks making them easier to assemble into the final blocks. What you see are un-squared, un-trimmed blocks.
`
`
I took my large ( 4-1/2 inch) triangles folded them in half and lined them up with the center of the winged- square triangle and made sure when I opened it up to line up the diagonal. I then would sew it together. I could have trimmed the 4-1/2 inch triangles but in the past when I did this I usually ended with too small blocks. By doing it this way I can fudge and come up with perfect blocks for assembling.
`
`
`
`
Since I was using larger triangles I was careful to line them up at the center then I would keep the edges together as I sewed. Once I pressed the blocks I would then trim them. I do not square them up to size until I plan to use them.
`
`
`
`
A lesson I learned the hard way is to check the straightness of the bias edge on the winged square block. I always make sure I have straightened the bias and I have a quarter of an inch off the center. You can see that sometimes in piecing a patch can get out of alignment. I sliver trim to maintain the best edge making it easier to sew and making a nicer block. If you have too much fabric off the center you can end up with a floating square.
`
`
`
`
On the left you can see a patch sewn thru the quarter inch seam allowance exactly or a thread over from the cross section of the seams. It results in a square then is right along the large triangle. It is a correctly sewn block and if you were to enter a JURIED quilt show the judge might be checking the accuracy of your pieced work for this traditional block.
`
`
That said I like to float my blocks, especially when I am planning to use certain settings for my blocks. I like to see them float within the block. I often piece so there is a small distance (about 1/8th inch) away from the large triangle. I especially like this when I use the FURROW OR ZIG ZAG setting for my blocks. (See: Setting styles) It is best to strive for consistency in your patchwork whether you sew the traditional block or float your block. The quilt looks best when you are consistent in your style.
I am missing some pictures and I will be posting them here, soon.
I feel strongly that each quilter must make accommodations to their quilting style, skills and LIMITATIONS. I plan show what I know to be the best of my knowledge a correct way to do a block; but it is not what I always do.
Today I did a lot less sewing so there is not as many updated. I did half the work of EASY STREET : Step THREE I made my squares with triangle wings. I also found a lot of scraps from previous projects and used the green ones for some of my triangles. They were already cut from 4-1/2 inch blocks so I decided to use them. I will discuss this further, when I have my pictures posted.
My morning was uneventful, lazing around with my grandson. He has a cold so he was not very energetic. I had to make a drug store run for cold meds, juice, pop and some other goodies. Of course the drug store is about 100 yards from JoAnn Fabric so I stopped in there and picked up with coupons some goodies I have been wanting:
New FONS AND PORTER Design wall New F&P Pyramid ruler, I was disappointed it was so small only 6-1/2 inches in length. Thread ( not on sale) New ironing board cover I picked up several quilt magazines, Winter Issue: Quilt Maker 100 BLOCKS, and Fons and Porter Scrappy Quilts
I was going to get a few fat quarters of really interesting prints but after going through my stash yesterday, I talked myself out of that. Although I love the prints on JoAnn’s fat quarters, I am always disappointed in the griege goods / base fabric. It tends to be thin and sleazy, very stretchy when you work with it. I could see the cardboard through the fabric. In the past when I used JoAnn fat quarters I usually reinforced it with thin iron on Pellon, cause there are times I have to have the print.
I did finish my BRAVE WORLD BLOCKS and have been playing with them on my design wall. I will post pictures as soon as the battery is charged….
See ya later, Nonnie ~~~~~~~~~~~~~~~~~~~~~~~~~~~~~~~~~~~~~~~~~~~~~~~~~~~~~~~~~~~~~~~~~~~
I made my BRAVE WORLD BLOCKS then started to play with them on my design wall. I have been told that BRAVE WORLD blocks can be put into any setting that a dark and light log cabin or split nine patch setting. In the past when I played with these blocks I got something like 6 setting styles but I know there are more. I am anxious to see what BONNIE HUNTER has come up with to use these wonderful blocks. My next post will be about some of the tips I have for making these blocks. I will warn you right now…. I show you traditional but I usually make a wonkier, more liberated block, as I like my blocks to float.
traditional setting
This is one of the traditional settings for BRAVE WORLD BLOCKS
zig zag setting
Any setting used for other light and dark blocks can be used.
I have a gift to finish for my niece. The FMQ baby quilt that I have been blogging about the last couple of posts. I also plan to work on my BRAVE WORLD BLOCKS for Bonnie Hunter’s EASY STREET MYSTERY QUILT. NO pictures YET… but I plan to post HERE as I go along. I have not even rolled out of bed.
I saw my sewing machine but that is about it. I got the bright idea of going into the basement to pull out fabric from my stash. I started to panic when I could not find the box of YELLOWs and GOLDs I planned to use for my colors. I started going thru stash and scrap boxes looking for the yellows and gold that may have been missed filed. After all I need just small squares. I swear I should have my head examined when I look at the gluttony that is in my stash. An hour into cleaning / searching the basement I found my box of yellows and gold. I then pulled out all the small pieces. I made a new rule for myself:
ONLY FABRICS THAT HAVE BEEN CUT INTO CAN BE USED PROJECT. THE RATIONAL IS THAT I HAVE HAD THE EXPERIENCE OF CUTTING INTO A FABRIC I WAS GOING TO USE IN A PROJECT AND THEN DID NOT HAVE ENOUGH TO FINISH SAID PROJECT AND HAD TO IMPROVISED. FABRIC ALREADY CUT INTO SHOULD BE FAIR GAME. I HAVE TONS OF FAT QUARTERS THAT HAVE HUNKS TAKEN OUT OF THEM, SO THEY ARE FAIR GAME FOR THIS PROJECT. .
I had to stop searching the basement when my four year old grandson came down and wanted to “HELP.” I told him I was finished and then we went up the stairs. The basement is where we stash the Christmas presents. That kid is too smart and would figure things out. Last year he asked us, ” WHY DOES SANTA USE THE SAME WRAPPING PAPER AS HIS MOM DID.” We lied and said we sent Santa our extra rolls of Christmas wrap so he could use them on presents. Santa takes donations of money and supplies. That is why we help him out by buy gifts for TOYS FOR TOTS. Works for us.
Back to sewing….. I am now in the process of making sure the fabric I select has been pre shunk and is ready for cutting. I have a rather unique preshrinking method that someday I might tell you about. Still no pictures.
Disaster struck in the form of a 4 year old little boy and a paint brush. My grandson was painting with water colors and got them all over my quilt when he spilled the brush rinse all over the floor. I tried spraying the quilt with cold water but that did not work very well to get it out. The quilt is currently soaking in cold water and I will spin it dry when I have rested a bit. I had to clean the floor after I put my quilt to soak. My poor grandson was so upset.
On the sewing front….. I spent the morning FMQ on the border. I am practicing making sharp points… not doing so good… need a lot more practice. The border on my panel has a irregular check gingham border so I used matching thread and quilted it trying to maintain sharp points when I turned direction…. STILL need more practice. I did not have enough of one spool of thread but I had several nearly perfect half spool of thread so that is what I used. I changed thread every ten inches so that if a person used a magnifying glass to check out the thread colors it will look like an ARTISTIC decision instead of a MAKE DO WITH WHAT YOU HAVE decision. I will get back to the quilt after it air drys… probably over night.
All is not lost that means when I get back to work later this afternoon I will be working on the BRAVE WORLD BLOCKS for Bonnie Hunter’s Easy Street Mystery quilt. I have decided to make 20 of the blocks since I am just a making a baby size quilt. Bonnie said all we need is 64 blocks for a big quilt; making just 20-25 will be more than enough for a baby size quilt.
This is the front of the quilt, I am not sure if you can see the asymmetrical grid FMQ I was able to accomplish. I did not make any regular pattern, it was more what ever I felt like at the moment. And yes I crossed over lines. I do not know who ever made it a rule you can not quilt over a line; I think it may be from hand quilting tradition. I did get some puckers on the back but that was the results of poor pinning not crossing over stitch lines. I am thinking I will try spray basting next quilt, using 505. I have avoided spray basting due to DD’s allergies but if I do it when she is not home it should be okay. I always do a first wash and blocking before I give a gift.
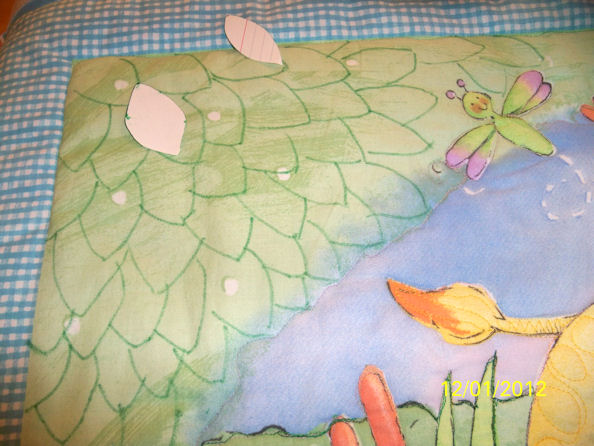
In a previous post I talked about using CRAYOLA WASHABLE CRAYONS for marking my quilts. I used it a leaf section here, I then sprayed with water just to make sure it will wash out without problems. I did not want to recommend something and then not have it work for me or someone else. On the back in the next picture you will see some residue from the CRAYOLA WASHABLE CRAYONS but I just checked and those marks are also washed away.
Well this is all for right now. I am have errands to run but plan to come back and work on my BONNIE HUNTER EASY STREET MYSTERY QUILT; STEP 3… the BRAVE WORLD BLOCKS.
I got smart… I printed out the instructions to PART THREE. So much easier to read in print then on the computer… plus I can take notes on the paper. Back again later… have some cutting to do.
I cut out my patches for the BRAVE WORLD blocks. I have laid out several of the blocks (see the picture.) I have more; I am having trouble trying to decide what shades of green and yellows to use. I find that the greens range from blue green, green and yellow green. I have limited number of light greens and light yellows. I am thinking the yellow green blocks look best with most of the duller yellows and gold; but the bright, true yellows look better with the blue greens. I also find I do not care for blue greens and yellow greens put side by side …. they clash in my mind.
When shopping for fabrics I find a lot of mediums but have trouble finding really light fabrics. I have better luck with darks but even those are found less often than medium tones. Yes, this is a scrappy quilt but I believe in controlled scrappy. I have seen too many UGLY QUILTS in my time to make an ugly quilt. Besides, I find it fun to make ARTISTIC DECISIONS VISUALLY.
Currently, I plan to sew my blocks together tomorrow. Too tired tonight and I have a HOT DATE with a four year old.
BRAVE WORLD blocks
*
*
*
*
*
*
*
*
*
*
*
*
*
*
*
*
*
*
*
*
*
Well good night and I will post again tomorrow.
Nonnie
I have used Eleanor Burns method of making flying geese for years. I have not made geese recently. When I joined the pod-caster quilter group making the EASY STREET MYSTERY QUILT I was using the Bonnie Hunter rulers. I was having the devil of a time ( see previous post) I finally figured out what I was doing wrong and corrected my mistakes. My mistakes were lazy quilter mistakes like not reading or following the directions. I also did not want to look through my junk to find my LITTLE FOOT presser foot which is one of my most accurate piecing foot. Once I finally broke down and corrected all my laziness my blocks came out much better with less effort. Bonnie’s RULER method worked fine for individual geese but I wanted to make my geese faster and easier.
I switched to using Eleanor Burn’s method but making adjustment to her directions for the 2 inch by 4 inch geese in order to get the correct measurements for EASY STREET geese size. ( 2inch (ht) by 3-1/2 inch(w.)
Here is my link to pdf files that give great directions for making FLYING GEESE using Eleanor’s method.
Large square is called the SKY and measures 6-1/2 inches square.
The smaller square will make the geese and measures 4-1/4 inches square.
When trimmed up they will make 4 flying geese measuring 2 inches by 3-1/2 inches.
I verified these measurements by making several sets of blocks using these measurements.
WORKS FOR ME! Let me know if it works for you and if you get the same results.
Mark the squares on the diagonal for sewing. You can mark just the diagonal and sew a scant quarter inch from the diagonal mark. OR You can mark the sewing lines using a QUARTER INCH RULER as shown in my picture. Do be careful of where you mark, as on one set I had pencil marks showing and graphite does not move readily.
CUT apart and press then align.
Once cut apart you align the goose sections, there will be miss alignment on the sky sections with funny wings. Mark the diagonal again and sew scant quarter inch seams.
Sew the diagonal seams then cut apart. Press carefully so the blocks are flat.
Clip the seam on the back so you can press your seams in opposite directions. Press so the block likes flat.
Cut the blocks apart. Be sure you allow a quarter inch off the peak of the goose or your block will look blunted.
TRIM UP the blocks to 2 inches and 3-1/2 inches per directions in EASY STREET part 2. I know some people do not like to trim up blocks but I prefer to have accurate size patches for piecing and this is one of the easiest way of achieving accurate patches while making multiples.
These are the patches I made using 4 different methods. I will be posting picture of other methods in the future…. MAYBE.
LINK : QUILTING POD- CASTER LINKS FOR EASY STREET MYSTERY QUILT
I will be adding pictures to this post as I noted there are some steps missing. Sorry about that.
WHERE THE JIG JOGS COME FROM : I made several geese using Bonnie’s method and got junky jig jogs in my geese. I could not figure out how I got them. I found I had to maintain the quarter inch seam very carefully.
I had a very frustrating evening trying to make the flying geese units for this EASY STREET MYSTERY QUILT. I have not made individual flying geese in eons. I usually use the method Elenore Burns taught in her FLYING GEESE book. I just do not know how to get the 2 x 3-1/2 inch blocks using this method. I wanted to use the rulers because I had the pretty indigo STRIP IT fabric and I wanted to take advantage of the fabric to make my quilt.
The first problem I had was getting the correct cuts using the EASY ANGLE RULER. I thought I understood the video but after a few cuts I found out I did not. I went back to the video and re-cut some patches. Most of my previous patches were salvage with some sliver cutting. I found I had difficulty lining the engineered pieces and getting them sewn straight. The bias edges kept shifting and getting out of alignment so I ended up pinning after awhile. I also went back to the directions and found I had sewed the left wing first. The second set of geese sewed easier when I followed the directions and sewed the right side of the triangle first.
I could not decide which way to sew the geese when I started sewing my patches.. DO YOU START SEWING FROM THE POINT TO THE FLAT SIDE or DO YOU SEW FROM THE LONG SIDE TO THE POINT OF THE PATCHES. I found when I sewed from the point the alignment shifted and I got a jig jog in my patchwork and the sides of the geese were crooked. (See pictures ) I went back to Bonnie’s photos and watched how she set up and sewed her patches. I think the last three patches worked out better. I guess I have some un-sewing to do.
The first of the geese I made with the Easy Angel and Companion Rulers
Question on pressing:
I usually press to the dark, but with these flying geese the patches want to lay toward the sky (lighter fabric) … They just lie flatter. When you press your geese do you press to the sky or to the goose.
Thanks for any answers,
Nonnie
JUST IN CASE YOU ARE WONDERING… I WILL CONQUER THESE PATCHES… I WILL NOT LET THEM DEFEAT ME. I JUST MIGHT HAVE TO TRY A DIFFERENT TECHNIQUE. I do wish I had read BONNIE’s post from today where she showed other methods of making the geese.I have not been printing out the directions but I will do so from now on.
DUH!
I used Crayola Washable Markers to mark my quilt top… washed out of GdS clothes… will wash out of the quilt top.
I used Crayola Washable Markers to mark my quilt top… they washed out of GdS clothes… will wash out of the quilt top. I make paper templates from index cards to do a layout of the leaves. Works for me on family quilts, but I do not use them for fine, heirloom quilts. TOO CHICKEN. I like the fine tip Crayola markers the best. A draw back to using the markers is they do not mark an entire quilt top. They run out of ink. I buy them by the bulk during school sales. They also will dry out if not used in a year.
Another drawback to the markers, is keeping my grandson from using them. I buy him several boxes of markers but he always steals my boxes.
Here is the picture after I FMQ the top. I have not ever have the markers not wash out of my grandson’s clothes, but if the marker does not wash out of the quilt it will add some shading to my top.
On the right side of the quilt, I wanted the leaves to look different so I surfed threw LEAH DAY’S FILLER BOOK and picked a pattern that I liked. … http://freemotionquilting.blogspot.com/ LEAH DAY’s FMQ PROJECT … I then drew it out in a newsprint sketch book. When I drew the pattern well enough I marked it on the quilt. My goal is to not have too dense of quilting as it will make the quilt stiff. I hope to FMQ the leaves tomorrow. I will then have just a small section of sky left to do but I need to make a run to JoAnn’s Fabric and get some threads. I also need to get some cording for piping that will be part of the border, although I am having second thoughts about piping.
Well this is it for tonight. I spent the day taking my grandson to a birthday party and this night babysitting two four year old boys….. I AM BEAT… SO GOOD NIGHT.
I am so jealous of the ladies doing BONNIE HUNTER’S EASY STREET MYSTERY QUILT I had to join in. Problem is I need to make some baby quilts although one is not due of 6-7 months. I am going to make a 48 x 48 baby quilt which is roughly one quarter size of BONNIE’S quilt ….. So I am going to make about 50 of each step realizing I will have extra patches when I get done. Since I am starting two weeks late I have two steps to get done.
I routed through my stash and pulled a bunch of greens and blues I dithered about the third color. I finally decided on yellows leaning toward golds. My rational is these are analogous colors on the color wheel and look good together. (THANKS SANDY, QftRofU) I did not have a good CONSTANT COLOR so I took a quick trip to the LQS. THAT turned out to be a bad decision for my pocket book. I ended up buying several yards of 108 inch backing fabrics. I did pick a lovely turquoise for the CONSTANT fabric.
Where I really got into trouble is when I watch my friend Kay who works in the store, open up two bolts in STRIP IT FABRIC. I had never seen STRIP IT FABRIC before. Strip It fabric is fabric made in 2-1/2 inch strips running the length of the fabric. (see pictures) You can use it for different patterns but it is often used as borders, or you can cut the strips for jelly rolls. You get about 17 different strips of a two color print. ( I bought indigo with white and black and white.) They can be used in any jelly roll pattern, but it does take special cutting techniques. I used scissors to cut off what I needed. ( I am thinking I will make every patch a different scrap.) My scrap bag is huge so I bet I can fish out enough of each color to have a totally scrappy quilt. I know that I am not cutting my fabrics efficiently and will probably be sewing just as inefficiently but the whole point of this project is to HAVE FUN!
I plan to get caught up with step one after I make my flying geese…. I will keep you posted. Just so you know that I am not totally nuts, I do cut my background the traditional, Bonnie Hunter way. ( The background it boring Kona white.)


 From a 8.5 inch x 10 inch patch one triangle can be obtained.
 TWO pyramids are obtained from 9 inch x 18 inch Fat Quarter section.
  MOCK UP of Pyramid Quilt with rainbow color plan