MS JULIE BROWN … a Michigan hand quilter …. trunk show

Last night our guild was treated to a trunk show of a life long quilter.  Julie Brown a local Michigan quilt has been quilting for over 35 years.  She brought her quilts dating back to 1978.   Ms Julie discussed how she came to quilting, the fabrics available  and the techniques she learned over the years.  I am posting the pictures of the quilts I liked best. I will be posting more so check back in the future….. So enjoy …

http://www.appletreequilt.com/

http://www.appletreequilt.com/contact-us.htm

Address

5269 McKinley Road

Flushing, MI 48433

Email

info@appletreequilt.com

Phone

(810) 659-4190

Store Hours

Monday – Saturday, 10:00am – 5:00pm

Closed Sunday


*

*

*

5 Oriental ORIENTAL QUILT and Shikoku stitching

6 - center star Star Center

8- dj-editDear Jane

24e-e- DEAR JANE CLOSE UPclose up of the quilting

22ee- double hatch & pumpkins HQhand quilting traditional pattern.. pumpkin seed and double cross hatch

13Eee-- edit --PRINCESS STAR & LOG CABIN

FYI …… I did edit some of the background around some of the quilt.  I also change brightness on the photos as my camera tend to take dark pictures that are not flatter the quilt.   When posted the dark photos do not show up well on the internet.  If I find I over adjusted the pictures I try to re fix the photos and repost/ edit at a later time.

No INTERNET means I actually sewed!

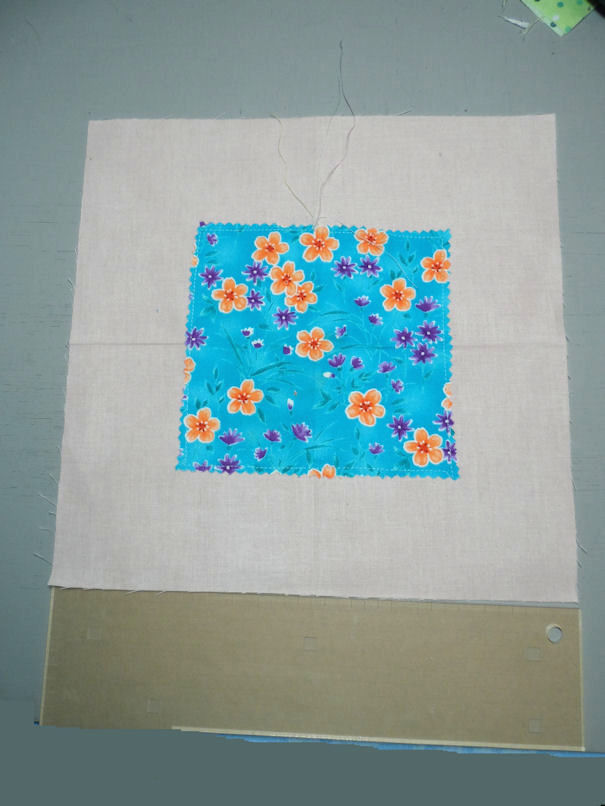
1-ruler used to place charms - then cut the patches

It took thirty minutes to set up for sewing the blocks. Most of the delay was due to the time I had to fussing with fabrics selection. The actual aligning of the blocks only took a few seconds. I am planning to track the time it takes me to make this quilt top. WHY you ask, cause I am curious.

good and bad corner stitching

I have been agonizing over this little quilt. The quilt started out as a guild project and then there was an announcement of a new baby on the way. So now I know that this quilt will be needed for a sweet little girl, due in August. My first idea was the Kona cottons with various patches from exchanges but I found the Kona cotton made the bright novelty prints look dull and muddied. If I used just white it just looked like a four patch on a white background, the pattern and technique was lost. Since I now had a special little baby to make this little scrap quilt for I wanted it more planned and controlled then I had originally planned. So I started planning the patches and using softer, sweeter fabrics from my scrap stash. ( I use a modified BONNIE HUNTER scrap system in that I cut patches into 10 inches, 5 inches and 2.5 strips.)

I am using decorative stitches to sew down the patches. This nails down the patches to background and controls the edges from fraying. To my surprise this has been the funniest part of the project. I have really been enjoying using the stitches on all of my machines. I have also started using decorative stitches to make the patches themselves. A technique I saw Pat Holly use in some of her quilts.

Some of the things I learned when sewing the patches to the background:

1./ Pull the threads to the back to bury them.

2./ Use school glue sticks ( washable) to tack down the corners if they do not lie properly.

3./ When sewing the corner down I would go to the very edge. I would reset the machine to a straight stitch then reprogram the decorative stitch to the same settings. I had practiced the stitches several times before using them on the blocks. I have a stitch journal where I take notes about the stitches and settings used.

4./ I find it especially important to know how the various stitches start. That helps me to pivot and produce a nicer corner. This is important for the patches cut on the vertical and the horizontal as the corners make a focal point of the blocks.

5./ Decorative stitches get lost on busy or printed fabrics. The stitches should go to the plain fabric or to the background fabrics so that it can be highlighted. I try to keep the decorative stitches highlighted.

6./ I am trying to select colors that complement the patches. My fall back color is variegated gold threads as it seems to work well the chosen fabrics without taking over and dominating the patches.

7./ As I am sewing I take a needle to sweep under the patchwork any fraying or loose threads.

8./ I need to find my quilter’s bar so that I can do better at sewing straight lines of decorative stitches. I tend to waiver and drift when I am sewing. I am looking forward to using more of my decorative stitches.

9./ I used Ricky Tims Stable Stuff as my stabilizer for the stitches. When the quilt is washed it will soften up and not add any stiffness to the patches. I like the way the stitches look when a stabilizer is used.

Making my own patches all PAT HOLLY
Making my own patches ala PAT HOLLY

Happy quilting Nonnie

LOOSE CHANGE – fun new technique !!!

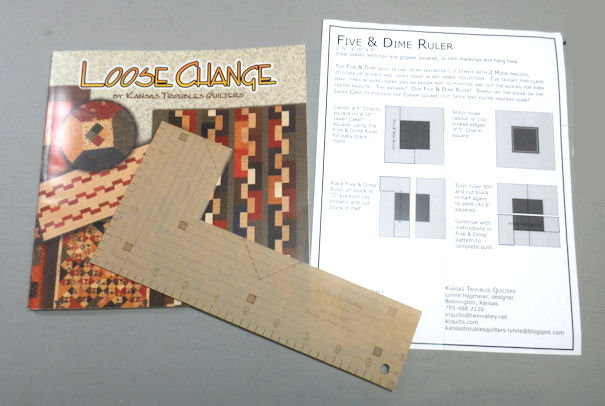
1e- book- ruler- directions

LOOSE CHANGE — NEW TECHNIQUE FOR PRE-CUTS– LAYER CAKES AND CHARM PACKS by KANSAS TROUBLES QUILTERS, AUTHOR : LYNN HAGMEIER. Of course, I did not follow the pattern exactly. I have a lot of make do patches to use so I am modifying the patterns accordingly. The book has about 5 quilt patterns I really like. I think this will be a great method to make donation quilts because it is really quick and easy.

Commercial Charm patch

A commercial charm square 5 inches by 5 inches is placed on a layer cake patch 10 inch by 10 inches. For a commercial charm since they are pinked can be stitched with a straight stitch. I used the special ruler to align the charm square and layer cake. Once sewn I used the ruler to line up the cuts. The book has clear cut directions on how to use the ruler.

.

Stash charm cut 5x5
Stash charm cut 5×5

I raided my stash and cut several patches 5 by 5 from large scraps or fat quarters. I tried two techniques, either one works okay but it is labor intensive. One set of patches I cut using my rotary cutter. The other set I pinked using pinking shears, while watching TV. I did this over several nights when I could not sew at my machine. I also had had a huge stack of 6.5 x 6.5 patches I got in guild exchanges over several years. I am using this for the diagonal blocks…. more on that later. I also straight stitched around the patch’s edges.

Decorative stitches used to sew the edges down.

I have since decided to stitch the edges of the charms with decorative stitches. Yes, it will take longer to make the blocks then using commercial charms and layer cakes and plain straight stitches. (The book said the quilt top could be made in an afternoon.)

.

Cut on the vertical and horizontal.

Once the patch is sewn you then cut the patch horizontally and vertically. The thread tails are cut off and will be in the seam allowances when you sew the patches together. You will need to make 12-16 of these blocks depending on the size quilt you will be making. I also make extras so that I have a good assortment of cut patches to make a pleasing arrangement. I am using solid KONA and tone on tones, cut to 10in x 10in, layer cake blocks as my background. The colors range from pastels to medium lights all from my stash. For most part I am using stash cut charm squares. I have a large assortment sewn and ready to be cut for more patches.

5- -BACK - seams open --BACK: seams pressed open

Once sewn I press the seam open. I found that due to the multiple layers the patches lie flatter when pressed open.

4 patch matched BLOCK A: four patches mixed and matched then sewn together.

I have made the equivalent of 10 blocks that will be divided into 4 patches and re-sewn to make scrappy FOUR PATCHES on a layer cake. Once sewn you loose a half inch to the blocks and they will need to be square up to 9.5 inch blocks before sewing them to Block B. BLOCK A and B alternate across the rows.

CUT on the diagonal
BLOCK B: Cut on the diagonal CUT on the diagonal
BLOCK B is cut on the diagonal. The patches are shuffled and sewn together.Second cut on the diagonal

Second cut on the diagonal
BLOCK B: Diagonal cuts

13- FINISHED BLOCKS-AFinished Blocks

Blocks A and B will be alternating across the rows. I have not decided on what size quilt this will finish at. 5 blocks across will be around 45 inches for a nice baby quilt; or slightly larger 6 blocks at 56 inches across. Down will be 5 or 6 blocks to.

For me this is a make do project in that I do not have any Layer Cakes or Charm Packs so I plan to go through my stash and just pick out suitable fabrics and cut my own 10×10 background and 5×5 charms. I also have TONS of 6.5 charms from charm exchanges at my guild and from on line. I will uses those in the diagonal cut B blocks. All in all this will be a cute project that will make some cute baby quilts for donation or gifts. I already planned some free motion quilting patterns using things I learned from my Craftsy classes.

If you use pre-cuts and plain stitching (charms with pinked edges the project can be done in an afternoon. It will take longer if you cut your own fabric from your stash. Also the use of decorative stitches will also slow the project down but it is so much fun to explore the fancy stitches on my machine. I also think that because I am not fusing, by selecting stitches that tack the edges down I will get less fraying.

Speaking of fusing, I found that the corners on my charms tended to curl when I was preparing them. If found I used a dab of washable glue stick, kept the corners under control, till they were sewn.

I also suggest when doing decorative stitches you start and stop the pattern at the corners of the charms. On my old machine I found by resetting the stitch to a straight stitch and then resetting the decorative stitch I got a much nicer pivot. I tried to take care that the patterns did not over lap each other, by straight stitching on the edge of the charm to an appropriate area where I could restart my pattern. I will try to post pictures of what I mean in another post as this explanation is as clear as mud.

This is the quilt technique I will be demonstrating in my quilt guild for the annual FOUR CORNERS TEACHING DEMOS in June. I plan to have a quilt top made demonstrating the techniques I have discussed here. I will have a mock up the steps and the book and rulers. (Books and rulers from a local quilt shop will be available for purchase.) I talked about this project on my last podcast, EPISODE 41.

Here is where you can see the video demonstrations of Ms Hagmeier’s technique …. QUILTING WITH THE STARS: FONS AND PORTER PRODUCTION

I also talked about the Ricky Tims Seminar. I blogged about the Seminar and have posted pictures in earlier blogs. Take time to check them out as the quilts are gorgeous. In a way this project is an homage to Ricky’s seminar as he said to always ask yourself, “WHAT IF” and I am ” WHAT IFF-ING ALL OVER THE PLACE WITH THIS PROJECT.

Happy Quilting,
Nonnie

~~~~~~~~~~~~~~~~~~~~~~~~~~~~~~~~~~~~~~~~~~~~~~~~~~~~~~~~

UPDATED: JUNE 22, 2013

I finally got this little quilt top assembled. I was not sure I liked the top because I felt the solids was too dull, but when it was assembled a secondary emerged and suddenly I love it. I chunked the blocks together and was only able to sew one section together each night after I got home from work. It actually took less then 6 hours to assemble the top and I finally got the chunks sewn together this morning.

Here is a bad picture of my cute little quilt. I do not have a place to hang a real design wall in my house. But I make do as best I can. I hung the quilt on a flannel back table cloth over the deck. I will get a better picture hopefully this week or when the quilt is finally finished.

assembled top
assembled top

Now I am going to iron this top and the backing then get it ready for the demo coming up. Then I will be sending this off to the long arm quilter for basting. I have some ideas on free motion quilting for this little quilt and I have the perfect thread picked out.

Time:
Cutting out the patches and assembling the units … 8 hours

Decorative stitching: I did that on nights I wanted just mindless sewing but I think that was another 4- 6 hours. Straight stitching would have been a lot less time.

The assembling of the blocks took less than 6 hours but it was divided up over several night.

TOTAL TIME: Estimated 20 hours

~~~~~~~~~~~~~~~~~~~~~~~~~~~~~~~~~~~~~~~~~~~~~~~~~~~~~~~~

Follow Me on Pinterest

https://nonniequiltingdreams.wordpress.com/ Nonnie’s Blog

http://nonniesquiltingdreams.podbean.com/ Nonnie’s Quilting Dream Podcast

Pod cast link for Nonnie’s Quilting Dreams

JOIN me at GOOD READS

email me at: nonniequiltingdreams@gmail.com

Nonnie’s Flicker Pictures

MY TAKE ON MODERN QUILTING AND THE MODERN QUILT MOVEMENT

I recently did a series of articles for my quilt guild.  Here is the first of several posts.  These are my personal opinions based on the research I have done in the last several months.  The opinions of other quilters may be different, but I am hoping to begin a dialogue with other quilters.  So if you have any ideas or comments just chime in and we can discuss it.

WHAT IS MODERN QUILTING?

For a while now I have been fascinated by the Modern Quilt Movement.  I first stumbled upon the modern style of quilt patterns on the blog of my quilting podcasting buddies.  I would follow links on their blogs and started seeing modern quilts.  As I read the blogs, I would comment or communicate with the authors.  I found I was often attracted to the patterns and colors of the quilts.  One day I stumbled upon the online MODERN QUILT GUILD (MQG) 

 http://themodernquiltguild.com  

http://themodernquiltguild.wordpress.com   

The MQG was organizing members on line.  Their rationale was that there were not enough members who lived close enough to each other.  Little by little the members in the same area started connecting and they organized brick and mortar guilds in the area where they lived.  Sometimes these guilds were off shoots of larger traditional guilds but more often they were independent groups.  Like traditional guild they evolved according to the group’s need.  Some are working groups where they learn techniques and work on projects.  Other groups organize themselves the same as traditional guilds. The majority have show and tell as part of their meeting. The groups tend to be filled with younger women who have just started quilting, but anyone who shared the same aesthetics and made modern quilts were welcome. 

The main difference from a traditional guild is the aesthetics of the quilts.  The groups belong to the main MQG, they continue to communicate and organize on line.   Blogs, Facebook, PINTERST and Flicker Groups connect the MQG community.  The growth of social media has spurred the growth of the MODERN QUILT MOVEMENT.  Often  members do not even live in the same state ( I am active in one group but am an on line member in several others.)

The MQG is evolving and growing, earlier this year they had their second QUILT- CON.  QUILT CON in the own words from their blog:

QuiltCon is the inaugural international conference and show by and for The Modern Quilt Guild. The first modern quilting event of its kind, Quilt-Con features top modern quilting instructors and will attract attendees from around the world. It includes a juried modern quilt show with cash prizes, vendors, lectures, workshops from top modern quilters, and more.

If you want to learn more about MODERN QUILTING you can check out the lecture series on Craftsy.  You do have to register on the website but you can sign up for several classes and the QUILT CON LECTURE SERIES for free.    You do need a high speed internet connection to watch the programs they do not work on dial up.  But if you can stream a TV show you should be able to steam these lectures.                          

http://www.craftsy.com    

http://www.craftsy.com/classes/quilting 

http://www.craftsy.com/class/quiltcon-lecture-series-2013/194


What are the aesthetics of MODERN QUILTING?

I did extensive research in what is considered MODERN QUILTING.  Just like traditional quilting for every modern quilter there is a different definition and an application of those definitions.  Modern quilters have differing levels of skills from the total newbie just learning to thread a machine to experience quilters who could win ribbons in any show.  Modern Quilters also have a growing group of quilters who publish patterns and books.  I am sure you have been seeing more books, patterns.  I do not think the MODERN QUILTERS are rejecting traditional quilts they are just finding their own voices and what fits in their lives.   I say bring them on let us welcome them to the club of quilting and enjoy their endeavors.

http://www.flickr.com/groups/freshmodernquilts

http://www.dsquilts.com/quilts.asp?PageID=1

http://www.flickr.com/search/?w=all&q=wonky+quilt&m=text

Modern quilting also reflects the change in ways quilters gather (online), share (flickr/blogs), and shop (again, online).  Sure, traditional quilters do these things too, but with the speed of the internet, ideas light up and take off in an instant.  Someone posts it on a blog, everyone sees it, and by next week, 20 people have made one already (more if someone creates a flickr pool for them).  You don’t have to wait for magazines and quilt shows to see what’s new.

As voiced by a recent essay winner in the magazine GENERATION Q:

http://generationqmagazine.com/2011/09/notions-winner-of-the-%E2%80%98what-is-modern-quilting-%E2%80%98essay-contest

http://generationqmagazine.com/what-is-modern-quilting-essay-contest/#3

Modern quilts display an effective use of the principles of design: movement, unity, harmony, variety, balance, contrast, proportion and rhythm.  Most interesting is that most modern quilters employ these principles organically, without any formal training or structure—they simply create what is in their hearts and minds of quilter.   Modern quilting alongside ancient and indigenous art and designs expresses the inborn drive of humans to create beauty.


Characteristics of MODERN QUILTING[1]:


[1]  CHARACTERISTICS  of MODERN QUILTING is a compilation of multiple sources  and some of my own observations based on what I have seen on Pinterest, Flicker groups.  Some of the notations are similar to each other as they share similar sources.  Some notations are a contradiction of previous definitions,  MQ is still evolving.


Base their quilt structure and blocks on design principals found in architecture  and art classes.

The defining design principles in modern quilting are rhythm and movement.

Designs exhibit influences of modern art and architecture

Functional /utilitarian quilts used in the home, not show quilts, not art quilts

 Simple, minimalist design using geometric shapes

One rule in modern quilting, it would be that there are no rules[2].

Expression of the time in which we live

Original form not always a recreation of traditional blocks or quilts; it is a blazing of new trails.

Reflect the individual personality and personal style of the quilter and it also reflects the current aesthetic of the day.

Asymmetry in quilt design

Frequent use improvisational piecing

Alternate grid work is often a part of modern quilt compositions

Bold colors, on-trend color combinations and graphic prints and use of complementary color schemes

Modern quilters tend to collect and use MODERN QUILT / GRAPHIC FABRIC DESIGNERS… Amy Butler, Tulula Pink

 Increased use of solid colors, including grey and white as neutrals

 Less emphasis on block repetition

 Increased use of negative space

Unusual block settings and block arrangement

Decrease use of borders, more edge to edge patterns

Pieced backings / dual quilts

Increased use of solid fabrics

The use of diverse fabrics (keeping in mind the way the fabrics different in their wearing and use.) is often found in the same quilt.  Using vintage and recycled fabrics in different ways is common.  I think this is an off shoot of inheriting stashes and thrift shopping.  Mixing fabrics types can frequently be found in a MODERN QUILT PROJECTs.

Block aesthetics:

Reinterpreted traditional blocks

 Unconventional block structures

SIZE of blocks and patches tend to be larger than traditional quilts (16 to 20 inches are common in Modern Quilting patterns.

Graphic / geometric block designs.  Fabrics are showcased not the blocks. 

Use of precuts and fabric bundles / kits is often used by the new Modern Quilters but they to branch off as their skill level and quest for personal creativity grows.

The piecing could be improvisational and liberated, or it could be very exact and measured, following a pattern or creating your own.

Using a traditional quilt block and updating the blocks :

using modern fabrics

 modifying the block arrangement

 modifying  the scale of the block


Use of technology in MODERN QUILTING …Beyond standard quilting tools


COMMUNICATION and Sharing:  Pinterest, Blogs, Flicker groups, Facebook  and twitter

ONLINE LEARNING STYLES … Craftsy, Flicker, YOU TUBE tutorials

BLOG TUTORIALS

SPOONFLOWER FABRICS for designing your own fabric

Design Programs such as Electric Quilt

Less high tech… sketch and design books and journals

Digital cameras are used for inspiration and communication of a quilter’s own projects for journals and blogs.

I enjoy  the MODERN QUILT aesthetics and what I have learned about the MODERN QUILT MOVEMENT, but I have never made a modern quilt.   I think I agree with a comment voiced by Angela Pingel on her blog  http://cuttopieces.blogspot.com  :

“The concept of modern quilting is not meant to divide or segregate. It is meant to welcome new quilters, of all ages, to the world of quilting in a style that they can relate to. In many ways, modern quilting takes us back to the basics of the early quilters, when women of the day used the colors and styles of their time to express themselves creatively.

THAT is the Modern Quilt movement that I want to be a part of.  I am sure that I need not put myself in the box of “modern quilter”.  I don’t put myself out there as a “traditional quilter” either.

I am, without any other label, simply a quilter.”

I too consider myself a quilter.  

Happy quilting to all my guild sisters. 

 NONNIE of Nonnie’s Quilting Dreams


[1]  CHARACTERISTICS  of MODERN QUILTING is a compilation of multiple sources  and some of my own observations based on what I have seen on Pinterest, Flicker groups.  Some of the notations are similar to each other as they share similar sources.  Some notations are a contradiction of previous definitions,  MQ is still evolving.

[2]   Even now the definition of MODERN QUILTING is changing and being further refined.

.

.

ADDED MAY 11, 2013

WALL STREET JOURNAL ARTICLE ABOUT THE MODERN QUILT MOVEMENT

MORE pictures from the Ricky Tims Seminar

I just want to tell you in advance my camera …. needs to be thrown out.  First I forgot to take the program off MACRO, so all my first set of pictures are fuzzy.  I was able to re-shoot lots of pictures but they will still need editing.  When the seminar was done I reset the entire camera to factory default.  I had been afraid to do that earlier because I was afraid to mess up the settings worse then what they were.  The settings  were fixable in an editing program.  The only thing I have trouble with is out of focus shots ( that was why had I had to reset the factory settings) but the focus settings had been messed with and I no longer knew how to fix the setting.  I think this will work.  WORD TO THE WISE NEVER LET A 5 YEAR OLD USE YOUR GOOD CAMERA…. give him an old one. 

I will be posting more pictures after I edit them.  the main edit will be re size to a size this blog will accept.  So enjoy.

190- photo ASTER -eWHOLE CLOTH PHOTO QUILT

This photo was printed from a 60 inch printer on to fabric on freezer paper. Ricky then FMQ accentuating the photographs. He used shadowing to maintain the integrity of the shapes. Everyone stopped to admire this wall quilt.

208E- ONE SEAM FLYING GEESEONE SEAM FLYING GEESE

Ricky said he made this 3d- ONE SEAM FLYING GEESE QUILT. HE taught this technique on the quilt show. I have made some of these quilts for kids, but I used larger flying geese units and novelty prints. Kids love putting little toys / treats in the pockets. It is a fun quilt. If somebody wants I will post the directions to the quilt I make using this technique. I have directions to multiple size geese and a rectangular block. LET ME KNOW IF YOU want me to post the directions.

237e- CELTIC - new patternRicky’s newest pattern

241-rhapsody MEDALLIONRHAPSODY, center medallion

243- LIBBY LEHMANTHIS is a LIBBY LEHMAN QUILT

269- dad's loan star rhapsody-eRicky and his father made this RHAPSODY QUILT Ricky’s dad made the lone star quilt and Ricky finished it with the applique and innovative setting. This is what happens if you let your imagination run wild and you push your boundaries.

2e-- kalidescopeKALEIDOSCOPE

197E---kalidescope-blueBLUE KALEIDOSCOPE


Ricky demonstrated the technique used to make a KALEIDOSCOPE QUILT. This is my daughters and grandson’s favorite pattern. I made a kaleidoscope wall hanging which now hangs in my grandson’s room. (See LOGO) He threw a fit when I tried to take it down from the wall to take to the seminar to have Ricky sign the back of my quilt. He can be so BRATTY!

201e-- curved pc -fire danceThis is another caveman piecing technique quilt that has applique. The caveman piecing makes a great background for applique.

202- cave man curved piecingShantel Tulip a caveman piecing technique shown during the seminar. He also has a DVD that teaches this technique is greater detail for people like me who have no memory and need constant reminding/ prompting on how to do a technique.
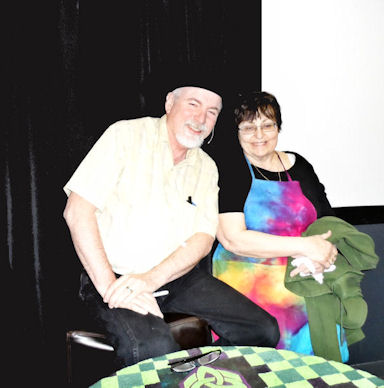
ANNA w Ricky-eeeeeLADY RAGS (AKA NONNIE) with RICKY TIMS

Happy QUILTING
NONNIE

Follow Me on Pinterest

https://nonniequiltingdreams.wordpress.com/ Nonnie’s Blog

http://nonniesquiltingdreams.podbean.com/ Nonnie’s Quilting Dream Podcast
@
Links for Nonnie’s Quilting Dreams

FOLLOW ME ON TWITTER @NONNIE_P ….. @NONNIE_P

email me at: nonniequiltingdreams@gmail.com
.
.

Ricky Tims Seminar in ROCHESTER MI

JUST got back from the Ricky Tims Seminar in Rochester MI.  I will be posting more pictures and information about my experience in the next couple of day.  Ricky has given permission to post pictures of the quilts at the seminar and I will be doing it as soon as I reformat the pictures.   IN the mean time I am posting just one or two …. plus the picture of part of my haul.  And NO I did not buy any fabric… I had promised my hubby that I would NOT…. but I did not promise I would not buy anything else. …. but I have no storage for more fabric so I was a KIND OF GOOD GIRL… so here are the pics…

15-RTS-15--RHAPSODY

.

.

.

10A- E- MIRROR IMAGE -ACCUCUTMIRROR IMAGE of APPLIQUE

.

.

.

purchases-ePURCHASE from the BERNINA booth at the Seminar

.

It is kind of hard to see what I bought…. NEW TOYS for my BERNINA 440QE

CIRCLE EMBROIDERY ATTACHMENT

MAGNIFICATION GLASS

FOOT #10 EDGE STITCH

FOOT #34 CLEAR APPLIQUE FOOT

FOOT # 37 1/4 INCH PATCHWORK

FOOT #43 FREE MOTION COACHING FOOT

FOOT #55 LEATHER ROLLER FOOT


SANDY over at QUILTING for the REST of US buys fabric dying supplies….. I buy toys…. love toys and gadgets.  I am so addicted.  NOW I have to get some sleep so I can play with my new gadgets tomorrow…. Bye for now.  ( MORE PICTURES COMING)

HAPPY QUILTING,
NONNIE

~~~~~~~~~~~~~~~~~~~~

.

Follow Me on Pinterest

https://nonniequiltingdreams.wordpress.com/ Nonnie’s Blog

http://nonniesquiltingdreams.podbean.com/ Nonnie’s Quilting Dream Podcast
@
Links for Nonnie’s Quilting Dreams

FOLLOW ME ON TWITTER @NONNIE_P ….. @NONNIE_P

email me at: nonniequiltingdreams@gmail.com

.