MAKE YOUR OWN FABRIC : MILE a Minute technique ….

I first learned to MAKE FABRIC when I took a class at my local sewing bee back in 2005.  The instructor was snow bird and she had learned it the previous winter in Texas.  She came back in taught it to us.  Since then I learned several other methods.  I am going to post pictures of how to make your own fabric … my way.  I will post pictures and directions.  I will post tips about the methods and what makes the techniques I use better.

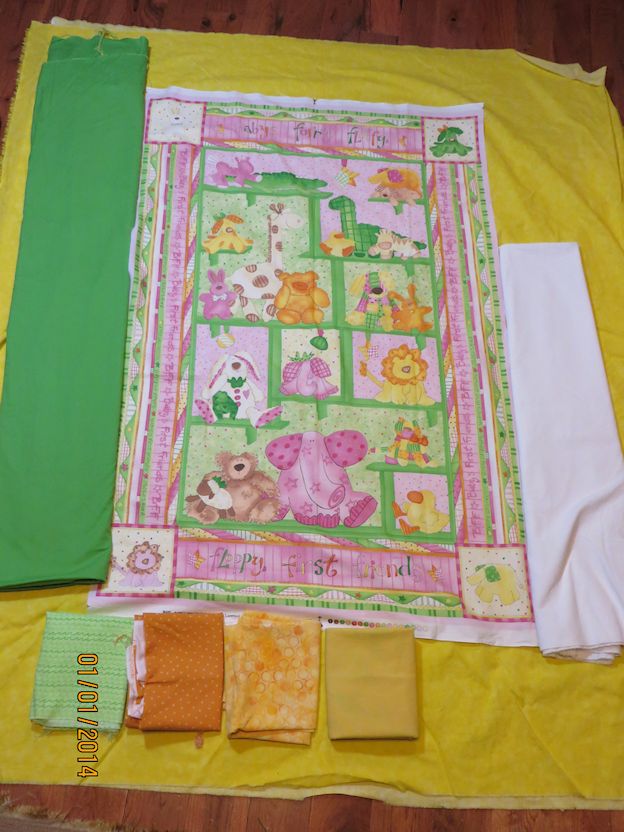
It starts with what you as a quilter have. I noted some of the tutorials actually cut yardage into chunks to use in their made fabric.   I use scraps and I have tons of them… going back 20 years or more.  As I pull out the fabric I discard any that are cheap, sub-standard fabrics…. Unless the fabric had meaning to me … i.e. fabrics from my mom, daughter, and family or special past projects.  If the fabric was questionable I just ironed on to fusible interface to reinforce it and used it anyways.  Once the fabric is made there are different ways of using the self-made fabric in your quilting.


I have noted that the SELF MADE FABRIC of today seems to be different from the techniques and style of fabric I have made in the past.   This is not a criticism but an observation.  I think a lot has to do with what fabric scraps the maker has available.  Many of the fabrics are blockier because they are made from strips, squares, blocks of fabric.  My SELF-MADE FABRIC tends to be wonkier and more angled because I use a lot of shaped blocks and I trim at angles. 


MILE A MINUTE BLOCKS  ….

This was the first self- made fabric technique I learned, it was taught at the sewing bee I mentioned before.  What was really fun as everyone brought a pound of their fabrics in a bag then we threw the fabric scraps into the middle of the table.  ( We had set the rule the smallest scrap had to be at least 1-1/2 inches square.)  Strips, chunks, ugly fabric whatever we wanted to use.  Our instructor said not to try and control our fabrics … but of course I did.  I personally dislike scrappy quilts that mix types of fabrics together… I like muted, grey fabrics with other muted grey fabrics … and bright clear colors with other bright clear colored fabrics.  I mostly do not like them mixed together.  We were suppose to just grab a hunk of fabric and use it in our self-made fabric.  I, all ways the rebel, cherry picked my fabrics and only used contemporary, more modern, bright colored fabrics.

I will say that this block is often my leaders and ender projects or mindless sewing project at the end of a sewing session.  I do several blocks at a time in that I sew my retro, muted fabric into one block and modern, bright fabric into another and I do not use the same blocks in the same quilt.  If the scrap does not look good in the block I am making it does not go in.


TECHNIQUE:

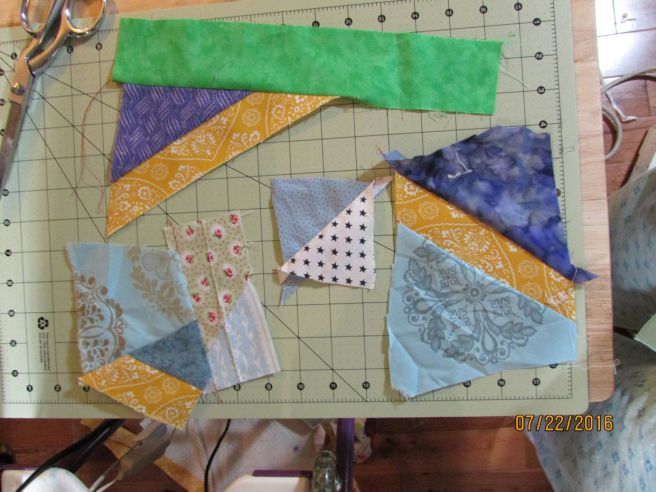
Take a strip of fabric at least one inch wide. I often have wider because that is what I have in my scrap bag. 

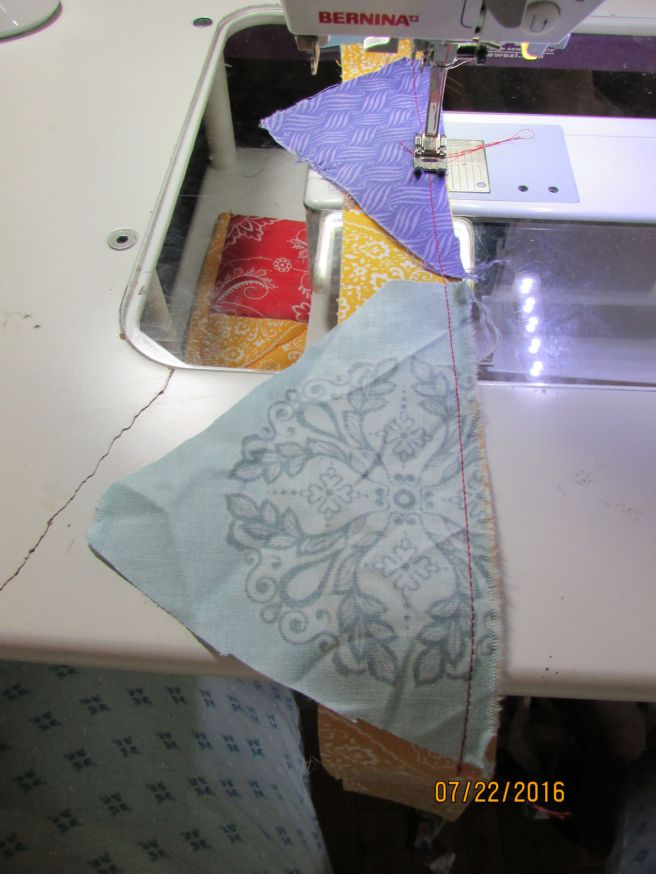
Chain piece hunks of scraps selected willy-nilly down the strip.

1 sew on string 1965

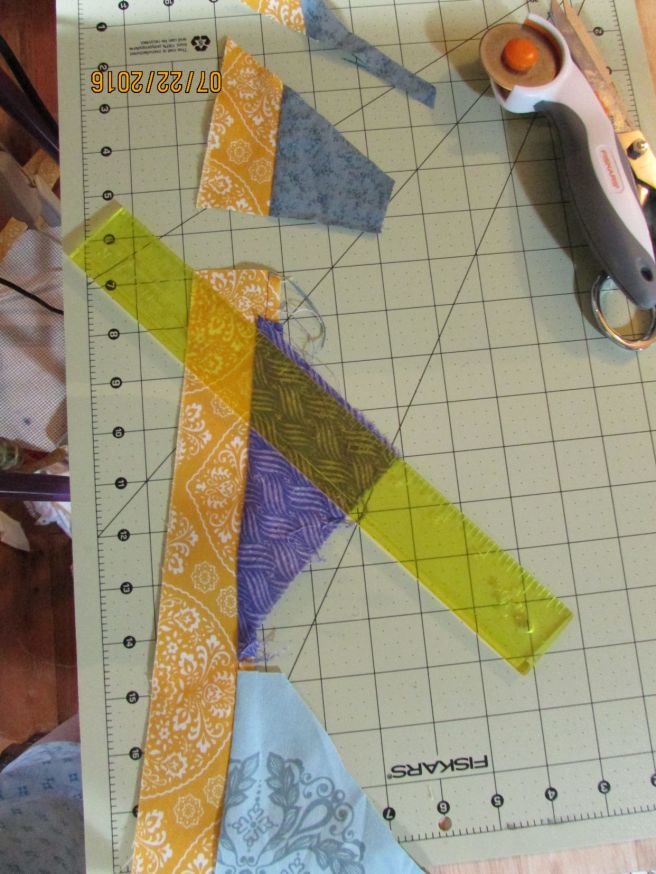
Trim your fabric strips apart. I usually angle my cuts but you can cut the fabric straighter ….. it is up to you.   You now have the start of your blocks. 


I press as I go as I use a small travel iron right next to the sewing machine. The pad is on a TV table.  I also have a medium cutting mat and rotary cutter on another TV table next to my sewing machine within reach. 


.2a trim _1966-r

.

2-trim 1967

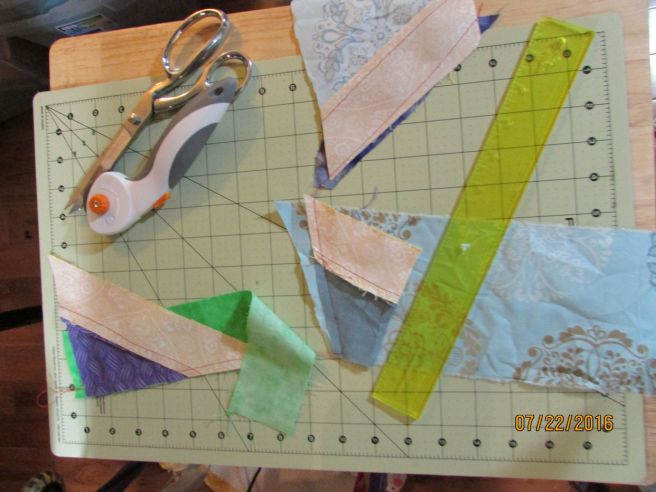
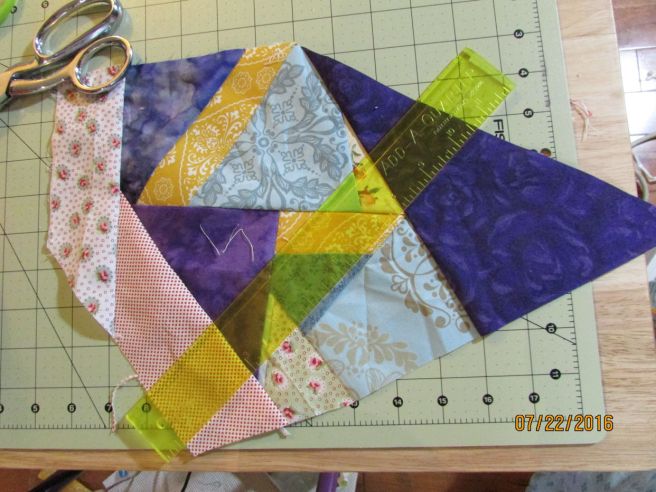
I sew my first patches to a new strip or to another hunk of fabric, once again depends upon what you have in your scrap bag.  Trim your patches and repeat the process until the SELF MADE FABRIC is the size you want or need.

As I progress I make sure to off -set the first patches so that the patches are not all in the center of the fabric I am making. I like a more eclectic, mixed look to my patches even though they have a lot of the same fabric scraps in the blocks.  I do try to mix up the fabric patches with different scraps so the blocks do not look the same.

3- continue to sew & trim 1969

I try to sew the added patches in a circular pattern similar to log cabin application.  That usually results in an interesting block.  Also adding triangles or hexagon shapes to the block  adds interesting angles.

4 - keep growing -1970


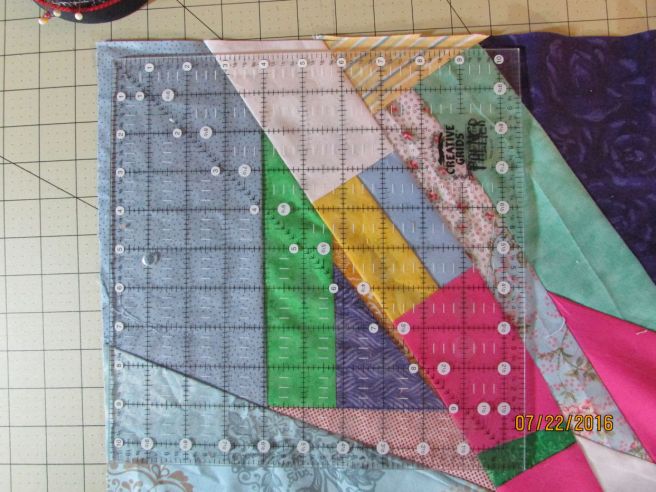
When the fabric is large enough I square it up to the correct size.  12.5 inch square is my favorite size.  Any cut off segments can be used on a different block.   

5- square up -1971


TIPS: 

As I progress the block I use bigger strips of fabric to the outside of the block.  I dislike seams and small chunks of fabric on the outside as it tend to make the seams bulky.

You can make the seam allowance open or to the side that is a personal preference.  Opening the seams is time consuming so I usually just press them to the side.

Be sure your block is flat.  Press as you go with and iron or finger press.  I have seen blocks made that puffed in the middle looking like D cup breast… This is usually cause by poor technique not taking the time to trim well or press as you go.   

Style wise I try to keep different style of fabrics seperated …. brights and contemporary does not get into blocks with repro, muted, greyed fabrics.   I just think the patches look better that way..

.

.

HAPPY QUILTING,
NONNIE

Follow Me on Pinterest

https://nonniequiltingdreams.wordpress.com/ Nonnie’s Blog
http://nonniesquiltingdreams.podbean.com/ Nonnie’s Quilting Dream Podcast
Links for Nonnie’s Quilting Dreams
FOLLOW ME ON TWITTER @NONNIE_P ….. @NONNIE_P
email me at: nonniequiltingdreams@gmail.com

Diary of a quilt — April 17th

RAFFLE QUILT


Day One:  I found out the girls at work are planning a raffle to help one of the co workers who is going thru a tough time due to health issues.  I get the idea to try and make a quilt by May 8th to raffle off at the bake sale.   I gather the quilt supplies.  I decide to use my  remaining NURSE BLOCKS to make the quilt.  I figure it is a natural winner because I work in a hospital.     (4-18-2014)


Day Two:   Using the blocks I have I start designing a quilt on my computer using ELECTRIC QUILT.   I took a picture of the blocks I had to work with and made a rough layout.  A friend of mine helped fine tune the design.  I did not have enough yardage for the back ground fabric so I bought some Kona Cornflower Blue. ( 4-19-2014)

Day Three:  I got the design wall out and hung it in the only place I have available…. Over the living room curtains.   Thank goodness my dear husband and family is use to my craziness and put up with it.  I take my blocks and lay them out in the pattern I designed soon realizing that my original pattern was not going to work.  I tweaked the design on the wall.   I have started sewing the blocks together.  Center and row two are assembled.   I am working from the center out. (4-21-2014)


 Finished Size should be 72 x 72 inches a generous size throw quilt.


Happy Quilting,

Nonnie


 LOOK WHAT IS COMING SOON…..

AmysCreativeSide.com

Playing some more in EQ7 — Version #2

I have been playing in EQ7 again… I started wondering what would a quilt look like if the small center squares in the uneven NINE patch blocks also had a strip of fabric, making it look like the big (A) blocks. So I redrafted my blocks and plotted out the quilt. I will tell you I have to work on the measurements for the the mathematical measurement would be 1.33 inches ( then you have to add a half inch for seam allowances to cut out your patches.) Who ever, heard of having 1.33+ patches, what number is that in real, useable measurements. I am going to have to convert those numbers but I am not going to deal with it until I actually have time to make the quilt. I will probably use my old tried and true method of cutting out the large patches ( on gridded paper) that fit the project then subdividing it to the appropriate size patches so they will fit the project. I have done this before and it usually works… best there is no math involved…

Here is an illustration of the EQ7 design.  I have found some cute baby fabric I can use to make this quilt  as a 3 block by 3 block layout.  Using large blocks result in faster assembly.  And as you know .. we have babies coming to this family.

*

MULT GRID QUILT - BLK - 16-IN- E-E-E
*
*
*
Well this is all for now… got to get to WALMARTS to buy some plastic tubs. This will be my first trip out of the house..
SO as always, HAPPY QUILTING,
NONNIE


 Follow Me on Pinterest
https://nonniequiltingdreams.wordpress.com/ Nonnie’s Blog
http://nonniesquiltingdreams.podbean.com/ Nonnie’s Quilting Dream Podcast
Links for Nonnie’s Quilting Dreams
FOLLOW ME ON TWITTER @NONNIE_P ….. @NONNIE_P
email me at: nonniequiltingdreams@gmail.com


Grid Pattern with 16 inch blocks … Drafted in EQ7

Being sick this last week I was unable to do anything constructive (ie sewing … drippy noses, sick to my stomach did not allow sewing)  I spent a lot of time surfing the internet and playing on EQ7.  I found some really neat pictures of quilts and then played with drafting the blocks in EQ7.  This was my favorite pastime between taking naps.  I am posting one of the quilts I drafted with some basic instructions for making the quilt. 

I am a novice at writing patterns so I do not recommend a new / novice quilter trying this pattern out.   I think you need to have some understanding of cutting and quilting to make this pattern.  I also think a DESIGN WALL is absolutely VITAL to assembling this quilt.  It is a giant color puzzle.   I am including different colorways for inspiration.  And an illustration for block B.  I hope this might inspire people to learn EQ7 and design some of their own quilt patterns.  I enjoy buying quilt patterns but sometimes I can not find them on line or from their origins, so I have to design my own.

Nonnie

GRID PATTERN -BLUE, GREEN, PURPLE

*

*

Fabric: 1/2 YARD for each large patch.  You should cut other patches at the same time.


Patch A : CUT 16.5 inches
Matching strips to be used in PATCH B  can be cut at this time:
8.5 inch x 2.5 x 4 patches for each blockI plan to cut a strip when I cut the larger 16. 5 patch.  These strips match a neighboring 16.5 PATCH A.

Cut 8.5 in square  for the center patch of any color you choose.
I will scatter these blocks to the opposite side of the quilt.

*

*

block sizes- 16 inch

*

This is a mock up of BLOCK B. it is what is called AN UNEVEN NINE PATCH.

*

*


Patch B:  

8.5 in    Center patch of any color you choose.  I  plan to cut a patch when I cut the larger 16. 5 patch  (THIS is a repeated step, you do not need to cut extra patches.) 

You will also need also need the 8.5 x 2.5 inch strips to match the neighboring Block A to construct this patch.

BLACK CORNER SQUARES:   4.5 inch you need 4 for each block.

Black Strips:    8.5 inch x 2.5 inch .x  4 patches   for each block.  This patch is is next to the small 8.5 colored patches to frame that block.

I consider the outer blocks unfinished along the border and plan to design the border so that the large patches have their strips carried off into the border.    Not sure if I will do anything with the BLOCK B patches in the border… I will probably keep it solid black.

ALTERNATE COLORWAY AND PLACEMENT
*

16 inch patch grid quilt- improved

Follow Me on Pinterest

https://nonniequiltingdreams.wordpress.com/ Nonnie’s Blog

http://nonniesquiltingdreams.podbean.com/ Nonnie’s Quilting Dream Podcast

Links for Nonnie’s Quilting Dreams

FOLLOW ME ON TWITTER @NONNIE_P ….. @NONNIE_P

email me at: nonniequiltingdreams@gmail.com
.
.

First lay out attempt for my NURSE’s RETIREMENT QUILT

MY NURSE RETIREMENT QUILT


*


*

This is my retirement quilt. I am making 64 blocks (8×8 layout) of my 12 inch blocks ( Queen Size.)  It will be re organizing them before I actually sew them together.  I do not care for the right to left diagonal setting that occurred with the colors.  I thought it would be left upper to right lower diagonal and I do not know what I did wrong.  I am going to lay the quilt out again.    

I also think I need to balance the quilt colors better I need to put in more blocks with the dark blue outer fabric through out the quilt.  I am also trying to make sure no two same nurse characters are next to each other. 

I really wonder how I get myself into these predicaments.

                          .
.

.
.

Follow Me on Pinterest

https://nonniequiltingdreams.wordpress.com/ Nonnie’s Blog

http://nonniesquiltingdreams.podbean.com/ Nonnie’s Quilting Dream Podcast
@
Links for Nonnie’s Quilting Dreams

FOLLOW ME ON TWITTER @NONNIE_P ….. @NONNIE_P

email me at: nonniequiltingdreams@gmail.com

Planning a baby quilt….

HAYDEN'S QUILT 65-E

This is the baby panel selected by my niece for her first baby’s quilt. The panel is 28 inches wide and 42 inches long. The CHALLENGE will be to get this quilt to about 50 x 50 inches, more or less in size. ( More of a toddler size then a true baby quilt. ) I am going to have to add 10 inches on each side and an additional 5 inches to the top and bottom of the quilt to get it close to 50 x 50 inches.

My current plan is a white border sprinkled with pinwheels. I will then have the green solid go around the extended panel at about 5 to 6 inches sides and top. I may have more pinwheels sprinkled in the green border… I will have to think about that. It will definitely be asymmetrical. I am not 100% sold on the solid green border as I think it looks stark but I would have to buy more fabric for a different border as I do not have any other coordinating fabrics. Poke dots or a soft stripe would look sweet but I do not have anything close to coordinating.

I rummaged thru my stash and found some coordinating fabrics. I am not sure if I am going to add some pink to the mix as this is an awfully pink quilt. But the more I look at it the more I see the green and yellow are also very pronounced in the quilt. The pinwheels will be white using the yellow and green fabrics and I am thinking some additional pink, again from my stash. ( The bright yellow the panel and coordinating fabrics are on is the backing fabric.)

Well this is my tentative plans… any input would be greatly appreciated.

HAPPY QUILTING
NONNIE

Playing with design techniques using graph paper and EQ7

Maple Leaf:


This is an EQ7 rendering of a maple leaf block.

I am blogging about the progress and design decisions I am making on my husband’s quilt.  I hope this will keep me on track and motivate me to continue to work on the quilt.

I have been trying to draft Maple Leaf pattern to the size I need using graph paper and pencils and on EQ7.  I know what I want to do but so far I have not been very successful.   I need to learn the EQ software better.  My computer drawing skills are dismal.  I  posted a picture of the EQ drawings and you will see what I mean.

After several attempts at designing the block I decided to wing it.  Here is a picture of my success (or failure)… this will go into the quilt but I have a lot to learn.   I will keep trying until I perfect the block patterns.  I also have several other patterns for different types and style of leaves.

I am using the inspiration I have been collecting for several years to design the quilt, but mainly it will be designed on a design wall.   Design visual arts / quilts visually.

   THIS is a rendering of the right upper leaf point.   I have done several versions of  this template.

You can note several mistakes on the quilt block.   I made a mistake on the stem piece coloration and had to redesign the stem.  I sewed the block using a inset seam technique but I should have just used an oversize block and used a half square triangle sew on the stem bloc instead.  I did not realize I could use that technique until after I finished the block.  YOU can also note the point on the leaf is out of alignment.  I need to work on improving the template for the point of the leaf.

 My plans for this quilt are to include every technique I know and want to learn.  I will be doing paper piecing and piecing quilt blocks, adding applique leaves by machine and probably some hand applique too.

Going back to my earlier post, PLAGUED BY UNCERTAINTY, I have the explanation of my thoughts about the color and style.  (Give away is in effect until end of June or early July, depending on my work schedule.  Just leave a comment and the win the chance for some books I am giving  away.)  I have re-purchased the fabric for the background, 11 yards of SHADOW PLAY by Maywood Studios.  This is in excess but I NEVER WANT TO BE SHORT FABRIC AGAIN.  Any left over fabric will be used in my stash.

You can note several mistakes on the quilt block. I made a mistake on the stem piece coloration and had to redesign the stem. I sewed the block using a inset seam technique but I should have just used an oversize block and used a half square triangle sew on technique the stem block instead. I did not realize I could use that technique until after I finished the block. My plans for this quilt are to include every technique I know and want to learn. I will be doing paper piecing and piecing quilt blocks, adding applique leaves by machine and probably some hand applique to. Going back to my earlier post, PLAGUED BY UNCERTAINTY, I have the explanation of my thoughts about the color and style. (Give away is in effect until end of June or early July, depending on my work schedule. Just leave a comment and the win the chance for some books I gave away.)

https://nonniequiltingdreams.wordpress.com/2012/05/26/plagued-by-uncertainty/ Plague by Uncertainty post one about this quilt

.
.
NONNIE,

FOLLOW ME ON PINTEREST !

https://nonniequiltingdreams.wordpress.com/ Nonnie’s Blog

http://nonniesquiltingdreams.podbean.com/ Nonnie’s Quilting Dream Podcast


JOIN me at GOOD READS

email me at: nonniequiltingdreams@gmail.com


.

.